Tuesday, 31 October 2017

How To Change Post URL of Already Published Post Without Losing Traffic

What you are going to learn today will help you throughout your online career. This tutorial is useful for any blogger, writer & SEO professionals.  In this guide you will learn about:
How To Change Post URL of Already Published Post Without Losing Traffic
  • What is the slug in SEO
  • What are stop words
  • What is 301 permanent redirect
  • How to edit post slug of a new post in WordPress (BlogSpot users can follow this guide)
  • How to change the Post URL of already published post
  • How to set up redirection in WordPress
Most of us learn about on page SEO at the later stage of our online career. Chances are, you might have already published a good number of blog post before you learned about the keyword optimization.
If this sounds like your story?
Well, I’m sure the next thing that made you stuck in your progress is: How do I take care of already published posts?
If you had tried editing the post slug of your old posts, you might have encountered 404 error & various other issues. This guide is the answer to all your questions & issues that you may or might encounter while changing already published blog post link.
Before you look into the solutions, first you need to understand some basic yet most important SEO terms. This term applies to any kind of Website or blog that you are running. Knowing this will also help you to analyze SEO techniques of other blogs & make your blog structure more search engine friendly.

What is post slug in SEO?

To understand post slug you need to first understand permalink. Read this guide that explains what permalink is & best permalink structure for SEO.
Post slug is the words that come in a blog post link after your domain name. For example,
Google-amp-WordPress is the post slug in the above screenshot.
In WordPress, post slug is automatically created from the post title. In the above screenshot, I have edited the post slug to make it search engine friendly.
Let’s take a step back & let me show you what is the default slug created by WordPress when you write a blog post.
As you can see the default slug created by WordPress is:
how-to-add-google-amp-to-wordpress-to-speed-up-your-mobile-site
The problem with default slug (Above example) are a lot of stop words which are useless & not recommended when you are optimizing your post for specific keywords.
This is a good time to learn about stop words.

What are stop words in SEO?

The most common words which are filtered by the search engine in a query are called stop words. An example of such words are: a, an, the, are, by, both
There are many stop words that shouldn’t be part of your post slug. Here is the mega list of stop words.  Stop words are not used or weighted heavily to determine relevancy in search algorithms.
  1. Post slug with stop words: how-to-add-google-amp-to-wordpress-to-speed-up-your-mobile-site
  2. Post slug without stop words: Google-amp-WordPress
In the first one, you can see you have 13 words in your post slug. In the 2nd one, we have only three words in post slug. This means that the important keywords in the first option (Google-AMP-WordPress) are given only half the weight they would have if there were no SEO Stop words. The second one (Post slug without keywords) contains more keyword juice than the first one.
Bonus tip: You should avoid using too many stop words in your post title, description (Without affecting readability), image alt text.
I don’t recommend you to go back & edit all blog posts & change the slug to remove the stop words. However, you can do that for important published posts which are not performing at all. Moreover, using this you know how to take care of future blog posts.

What are 301 permanent redirects:

When you are changing the post URL or permalink structure, we use 301 redirects. This is the best way to ensure that users and search engines are directed to the correct page. The 301 status code means that a page has permanently moved to a new location. You can set 301 redirects using .htaccess at the server level or if using WordPress there are plugins to help you such redirection.
We will be using 301 redirects to notify search engine when we change post slug. I have explained this in details in the upcoming section of this guide. For now, it’s a good time to watch this video to learn more about 301 redirection:

Subscribe on Youtube


How to change the Post URL of the new blog post:

When you are writing a new blog post in WordPress, click on edit below post title to change the post slug.

Clicking on edit will bring a screen like this where you can remove the stop words.
Make sure there is – (dash) between every word. Here is the final result:
This is one practice you should follow for all your future posts. Now, if you are wondering how to do it for already published posts, follow the steps.

How to change the Post URL of already published post

Like above, we do the same step for the already published post. When we edit existing slug, it would result in broken post. That means, if the search engine has already indexed your old slug or you have shared the post on social media, clicking on those links will result in 404 broken page. To avoid this, what we do is take help of 301 redirect feature.

How to set up redirection in WordPress

One of the reasons I love WordPress is for its simplicity to get tedious tasks done with the help of plugins. There are many WordPress plugins that will help you to set redirection. The one that I use is free redirection plugin. If you are using Yoast SEO premium, redirection feature is available for you already. You can also use any other plugin if you like. The only thing you need to ensure is, it should be a 301 redirection.
For this example, I’m using Redirection plugin.
Here is the scenario:
  • Already published post with URL: https://WPSutra.com/how-to-add-google-amp-to-wordpress-to-speed-up-your-mobile-site
  • New URL After editing the post slug: https://WPSutra.com/Google-amp-WordPress
Go to Tools > Redirection (or redirection tab of any other plugin that you are using). You can also set redirection using the .htaccess method.
Here you can set the 301 redirect from old post to the new one as shown in below screenshot:
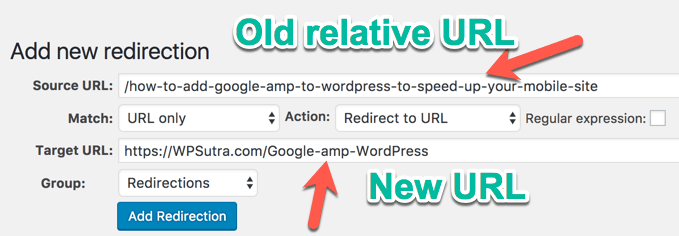
What this would do is, when someone will click on your old URL, they will be automatically redirected to new URL. This would ensure you wouldn’t lose any traffic after changing post slug of the already published post.
Do note that you would lose your social media shares number & that is a very little trade-off you need to make when dealing with editing old post URL. I usually do this for editing my old blog posts or dealing with non-performing blog posts.

Fine points when dealing with editing already published posts:

  • It’s completely fine to edit old post slug as long as you are setting up 301 redirect.
  • You would not lose any search engine traffic when editing post slug & setting up 301 redirect.
  • You would lose social media share as the post link changes.
  • It’s not recommended to change the slug of a high ranking blog post.
  • This is part of On page SEO.
From now on you should definitely practice this for all your new blog posts. At the same time, you can start editing post slug for the non-performing posts. Make sure you also follow steps listed here to make your post keyword optimized.
If you have questions regarding Stop words, 301 Perma redirect or changing post URL after publishing, feel free to ask in the comment section below. If you enjoyed this guide, do share it with your friends on Facebook & Google plus.

7 On-Page SEO Checks That You Need To Conduct On A Periodic Basis

On-Page SEO Checks
When it comes to SEO, we know that link building is an ongoing process, but more often than not, we tend to neglect the on-page SEO aspects.
Site updates, theme updates/changes, plugin updates, adding a new plugin/functionality, and other changes like updating a file using FTP can cause some accidental errors that could lead to on-page SEO issues. Unless you proactively look for these errors, they will go unnoticed and will negatively influence your organic rankings.

For instance, I recently realized that I had been blocking out images in one of my blogs for almost 6 months because of an old and neglected Robots.txt file. Imagine the impact such a mistake could have on your rankings!

On-Page SEO Checkup

Keeping the importance of SEO in mind, here are 7 important checks that you need to conduct on a periodic basis to ensure that your on-page SEO is on point.
Note: Even though these checks are for people running a WordPress blog, they can be used for any blogger on any platform.
1. Check your site for broken links.
Pages with broken links (be it an internal or external link) can potentially lose rankings in search results. Even if you do have control over internal links, you do not have control over external links.
There is a huge possibility that a webpage or resource that you linked to no longer exists or has been moved to a different URL, resulting in a broken link.
This is why it is recommended to check for broken links periodically.
There is a whole host of ways to check for broken links, but one of the easiest and most efficient ways is with the ScreamingFrog SEO Software.
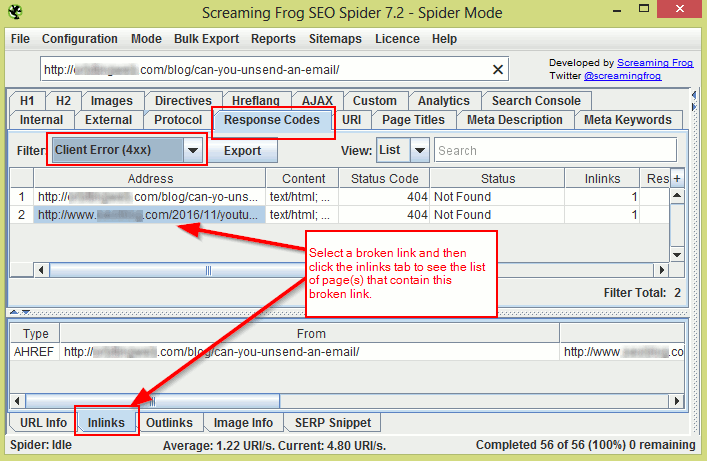
To find broken links on your site using ScreamingFrog, enter your domain URL in the space provided and click the “Start” button. Once the crawling is complete, select the Response Codes tab and filter your results based on “Client Error (4xx)”. You should now be able to see all links that are broken.
Click on each broken link and then select the Inlinks tab to see which page(s) actually contain this broken link. (Refer to image below.)
Screamingfrog links checker
If you are using WordPress, you can also use a plugin like the Broken Link Checker. This plugin will find and fix all broken links.
Another way to check for broken links is through the Google Search Console. Log in and go to Crawl > Crawl Errors and check for “404” and “not found” errors under theURL Errors section.
If you do find 404 URLs, click on the URL and then go to the Linked From tab to see which page(s) contain this broken URL.
2. Use the site command to check for the presence of low-value pages in the Google index.
The command operator site:sitename.com” displays all pages on your site indexed by Google.
By roughly scanning through these results, you should be able to check if all pages indexed are of good quality or if there are some low-value pages present.
Quick Tip: If your site has a lot of pages, change the Google Search settings to display 100 results at a time. This way you can easily scan through all results quickly.
An example of a low-value page would be the ‘search result’ page. You might have a search box on your site, and there is a possibility that all search result pages are being crawled and indexed. All these pages contain nothing but links, and hence are of little to no value. It is best to keep these pages from getting indexed.
Another example would be the presence of multiple versions of the same page in the index. This can happen if you run an online store and your search results have the option of being sorted.
Here’s an example of multiple versions of the same search page:
  • http://sitename.com/products/search?q=chairs
  • http://sitename.com/products/search?q=chairs&sort=price&dir=asc
  • http://sitename.com/products/search?q=chairs&sort=price&dir=desc
  • http://sitename.com/products/search?q=chairs&sort=latest&dir=asc
  • http://sitename.com/products/search?q=chairs&sort=latest&dir=desc
You can easily exclude such pages from being indexed by disallowing them in Robots.txt, or by using the Robots meta tag. You can also block certain URL parameters from getting crawled using the Google Search Console by going to Crawl > URL Parameters.
3. Check Robots.txt to see if you are blocking important resources.
When using a CMS like WordPress, it is easy to accidentally block out important content like images, javascript, CSS, and other resources that can actually help the Google bots better access/analyze your website.
For example, blocking out the wp-content folder in your Robots.txt would mean blocking out images from getting crawled. If the Google bots cannot access the images on your site, your potential to rank higher because of these images reduces. Similarly, your images will not be accessible through Google Image Search, further reducing your organic traffic.
In the same way, if Google bots cannot access the javascript or CSS on your site, they cannot determine if your site is responsive or not. So even if your site is responsive, Google will think it is not, and as a result, your site will not rank well in mobile search results.
To find out if you are blocking out important resources, log in to your Google Search Console and go to Google Index > Blocked Resources. Here you should be able to see all the resources that you are blocking. You can then unblock these resources using Robots.txt (or through .htaccess if need be).
For example, let’s say you are blocking the following two resources:
  • /wp-content/uploads/2017/01/image.jpg
  • /wp-includes/js/wp-embed.min.js
You can unblock these resources by adding the following to your Robots.txt file:
  • Allow: /wp-includes/js/
  • Allow: /wp-content/uploads/
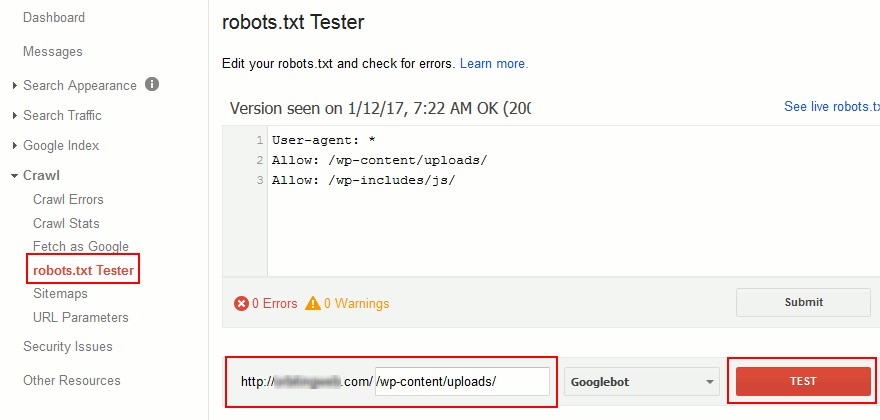
To double check if these resources are now crawlable, go to Crawl > Robots.txt tester in your Google Search console, then enter the URL in the space provided and click “Test”.
4. Check the HTML source of your important posts and pages to ensure everything is right.
It’s one thing to use SEO plugins to optimize your site, and it’s another thing to ensure they are working properly. The HTML source is the best way to ensure that all of your SEO-based meta tags are being added to the right pages. It’s also the best way to check for errors that need to be fixed.
If you are using a WordPress blog, you only need to check the following pages (in most cases):
  1. Homepage/Frontpage (+ one paginated page if homepage pagination is present)
  2. Any single posts page
  3. One of each archive pages (first page and a few paginated pages)
  4. Media attachment page
  5. Other pages – if you have custom post pages
As indicated, you only need to check the source of one or two of each of these pages to make sure everything is right.
To check the source, do the following:
  1. Open the page that needs to be checked in your browser window.
  2. Press CTRL + U on your keyboard to bring up the page source, or right-click on the page and select “View Source”.
  3. Now check the content within the ‘head’ tags ( <head> </head> ) to ensure everything is right.
Here are a few checks that you can perform:
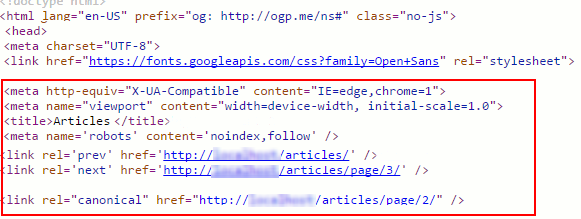
  1. Check to see if the pages have multiple instances of the same meta tag, like the title or meta description tag. This can happen when a plugin and theme both insert the same meta tag into the header.
  2. Check to see if the page has a meta robots tag, and ensure that it is set up properly. In other words, check to make sure that the robots tag is not accidentally set to Noindex or Nofollow for important pages. And make sure that it is indeed set to Noindex for low value pages.
  3. If it is a paginated page, check if you have proper rel=”next” and rel=”prev” meta tags.
  4. Check to see if pages (especially single post pages and the homepage) have proper OG tags (especially the “OG Image” tag), Twitter cards, other social media meta tags, and other tags like Schema.org tags (if you are using them).
  5. Check to see if the page has a rel=”canonical” tag and make sure that it is showing the proper canonical URL.
  6. Check if the pages have a viewport meta tag. (This tag is important for mobile responsiveness.)
5. Check for mobile usability errors.
Sites that are not responsive do not rank well in Google’s mobile search results. Even though your site is responsive, there is no saying what Google bots will think. Even a small change like blocking a resource can make your responsive site look unresponsive in Google’s view.
So even if you think your site is responsive, make it a practice to check if your pages are mobile friendly or if they have mobile usability errors.
To do this, log in to your Google Search Console and go to Search Traffic > Mobile Usability to check if any of these pages show mobile usability errors.
You can also use the Google mobile friendly test to check individual pages.
6. Check for render blocking scripts.
You might have added a new plugin or functionality to your blog which could have added calls to many javascript and CSS files on all pages of your site. The plugin’s functionality might be for a single page, yet calls to its javascript and CSS are on all pages.
For example, you might have added a contact form plugin that only works on one page – your contact page. But the plugin might have added its Javascript files on every page.
The more javascript and CSS references a page has, the longer it takes to load. This reduces your page speed which can negatively impact your search engine rankings.
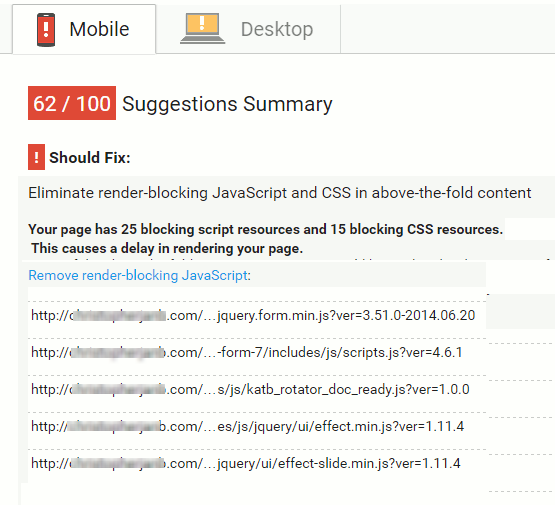
The best way to ensure this does not happen is to check your site’s article pages using Google’s PageSpeed Insights tool on a regular basis. Check to see if there are render-blocking Javascript files and figure out if these scripts are needed for the page to function properly.
If you find unwanted scripts, restrict these scripts only to pages that require them so they don’t load where they are not wanted. You can also consider adding a defer or async attribute to Javascript files.
7. Check and monitor site downtimes.
Frequent downtimes not only drive visitors away, they also hurt your SEO. This is why it is imperative to monitor your site’s uptime on a constant basis.
There are a host of free and paid services like Uptime RobotJetpack MonitorPingdomMontasticAreMySitesUp, and Site24x7 that can help you do just that. Most of these services will send you an email or even a mobile notification to inform you of site downtimes. Some services also send you a monthly report of how your site performed.
If you find that your site experiences frequent downtimes, it is time to consider changing your web host.

Things To Monitor For Proper On-Page SEO

These are some very important things to check for so that your on-page SEO stays highly optimized.

A Practical Guide For Growing Blog Traffic Using SEMrush

SEMRush For Blog Traffic Growth
SEMrush is one of my favorite tools, and I have mentioned it many times here at ShoutMeLoud.
It was around 2012 when I started using this simple search engine marketing tool, and in the past 5 years, it has become one of the go-to tools for bloggers and SEO companies.
If you are an existing user of SEMrush, awesome! You must know how great it is.

If you don’t have an account yet, you can use this link to get a 14-day free trial worth $150. 14 days is a good enough time for you to try out all the below-mentioned features as you improve your blog’s search engine presence (which will significantly increase revenue).
Recently, SEMrush has added some amazing new features. Here are my favorites…

New Features Of SEMrush To Grow Your Online Business:

1. Site SEO Audit
SEMrush now offers a complete site SEO audit with every plan (including their most basic “Pro” plan) which lets you find all of the SEO issues on your blog.
You can set up your site audit as a “campaign” and let it run at specified intervals (every week, every month, etc.).
SEMRUSH project
I have set up weekly reports for ShoutMeLoud as this blog is big and very active. What I like is that I only need to set up Site Audit once, and it will automatically send me a weekly report once the audit has completed.
Here is a report from a WPSutra.com (formerly WpFreesetup.com) site audit:
SEMrush site audit
  • Bonus Tip: If you are setting up Site Audit for the first time, you have an option toselect different crawlers. By default, the SEMrush desktop bot is selected for crawling, and you can change it to the Google desktop or mobile bot. I prefer the Google bot and suggest the same for you as it’s better to see the SEO report from Google’s perspective.
Crawler settings SEMRUSh
2. Social Media Analytics
This feature is in beta, but it is available for all current SEMrush customers.
Social analytics are a very important aspect of SEO and are often overlooked by bloggers.
This feature of SEMrush lets you audit your Facebook, Twitter, and G+ account.
Social media analytics SEMRUSh
You can also check your competitor’s social media account to measure how well you are doing against them.
social media email report
  • (At this time, SEMrush’s “Social Media” tool only supports the above-mentioned reporting.)
Your goal is to always get the green mark in your weekly report.
Here is the report from ShoutMeLoud’s social media channels:
Social media report
What I like here is the comprehensive detail on everything, including number of updates and engagement rate.
If you have a close competitor, you can get vital data like how often they are updating their social media account, and you can plan your strategy around their marketing campaign.
Since this tool is still in beta, I have a couple suggestions:
  • YouTube integration: Having YouTube here would be really helpful. These days, all bloggers are quite active with video blogging, and YouTube is always the platform of choice. I have mentioned earlier about VidIQ for YouTube users, and having that kind of data (data shown by VidIQ or TubeBuddy) would make SEMrush’s social media feature the first choice among video bloggers.
  • Improve engagement: Optimizing social media accounts based directly on a competitor’s report would also be very useful (especially for newbies).
3. SEO Ideas (You will love this)
This is a holy-grail for bloggers who understand the importance of keyword optimization.
The SEO Ideas tool simplifies the tasks associated with web page optimization.
By auditing your landing pages that appear in Google SERPs and comparing them to your competitors’ pages for the same keywords, SEMrush will give you recommendations for your optimization strategy and keyword targeting that could improve your search engine ranking.
Check SEO optimization of a page
You need to manually add all the pages of your website and add in keywords for which you want to get ideas. The report will be generated instantly.
Here’s what that looks like:
SEO optimization ideas
The coolest part is that it automatically pulls up landing pages with keywords based on your position checker settings(I talk about the keyword position checker in the next section.)
This tool analyzes the top 10 pages ranking for the same keyword (in Google) and suggests you changes on how to improve your rankings.
For backlink building, you also get suggestions for domains where you should try acquiring a backlink for higher ranking.
Here is an example of an SEO Ideas report page:
Improve webpage ranking
  • You should not miss their SEO Ideas statistics page, which is a dashboard in itself.
Here you can find the pages which need optimization (provided you have added them as mentioned above).
SEO suggestion dashboard
This is one feature that is under-utilized by many SEMrush users, and it really is something that you should not miss.
4. Keyword Position Tracking
Tracking your keyword position is probably the most important aspect of your website’s SEO.
The keyword tracking feature is the reason I started using SEMrush regularly.
Recently, they have just made a bunch of changes, and their tracking now includes:
  • Support for local SEO
  • Tracking keywords based on device
Keyword ranking tracker
What I like most about this feature is the ability to add keywords directly from Google Analytics. This really helps speed up the process.
In the below image, you can see some keywords which have been picked from my Google Analytics account.
The “Sandbox” is where suggested keywords are shown, and you can add or remove keywords as you wish.
Track Keyword ranking in Google
Don’t forget to check the “Send me weekly updates” section. You will receive a weekly email where you can track which keywords’ rankings have improved and which keywords have lost their ranking.

SEMrush Can Do A Lot

I have been a loyal user of SEMrush for years and it’s only because they keep adding new features which are amazing.
Not only did SEMrush help me grow my main blogs, it also helped me keep the SEO of my micro-niche site up-to-date. Usually, these micro-niche sites are ‘set it and forget it’, so manually keeping track of their SEO progress is a real pain. But SEMrush has stepped in and made this process a breeze.
If you are using SEMrush already, log in to your dashboard and start playing with these awesome features. If you don’t yet have an account, you can use the link below to get a 14-day (completely free) trial with access to all of these cool features included.
So now it’s your turn to let me know: How’s SEMrush working out for you? What’s your favorite feature? Do share your review and experiences with me in the comments below.
Like this post? Don’t forget to share it!

6 Awesome Tools to Find Long-Tail Keywords In Any Niche

I have written a lot about keyword research and its benefits. One of the major mistakes I have seen many people make is that they will target direct keywords instead of long-tail keywords (LTK) .
Finding Long-Tail Keywords
If you are not familiar with long-tail keywords, here is a quick example of the difference between short-tail and long-tail:
  • Long-tail Keywords (Ex. of short tail keyword) – Monthly searches 50
  • Long tail Keywords vs. short tail Keywords (Ex. of LTK) – Monthly searches 12
  • long tail keywords conversion rate (Ex of LTK) – Monthly searches 13
You may notice that the last two keywords have fewer searches, but the competition for these two keywords is far less than it is for the short-tail keyword. Also, long-tail keywords drive more targeted traffic than short-tail keywords do, so your conversion (sales, email sign-ups) improves a lot. If you want to learn more about this subject, check out How long tail keywords could equal massive success.
In this post I am sharing some of the best tools for finding long-tail keywords in any niche. Note that some of them are free, and a few of them are paid. I will explain the features of each, and you can choose any one that suits your needs.

Best Online tools to find Long-Tail Keywords:

Answer the Public:
Find Long Tail Keyword question based
This one is one of my favorite free long tail Keyword research tool. This one is in the line of Ubersuggest  but offers one unique proposition. Using this tool, you can search for any Keyword & it would show you common questions asked around that “Keyword” “Topic” in search engine.
This is the tool that all the SEO guys use as a complete SEO suite. SEMRUSH is the first finest SEO tool that was ever built to find keywords that your competitors are ranking for.
Unlike traditional keyword research, SEMRUSH takes away the guess work & help you quickly find long tail keyword from any website.  If you are looking for one perfect tool for long tail Keyword research, look no further than SEMRUSH.
You don’t have to believe me rather for next 14 days use SEMRUSH for free. 2 weeks are enough to help you decide if SEMRUSH is for you or not.
This is one of the newest entrant in the Keyword research tools market. However, the kind of features & functionalities KWfinder offers, it’s certainly one of the best tool out there.
KWfinder provide all important data about the keywords including difficulty level to help you find the easy to rank long tail Keywords. Persoanlly, after SEMRUSH is this is the second tool I use & recommend.

Google Auto Complete tool:
Long tail keywords suggestion
The auto-suggestion feature of Google search is your first free tool. This is a handy feature from Google, which will allow you to easily find long-tail keywords in any niche. Google auto-populates keywords (search terms) based on popularity. All you need to do is start typing your first keyword, and select the options from the auto-suggestion.
You will need to use another keyword tool to see additional details such as the number of searches, CPC, competition and other important information.  (On my micro-niche site, I usually skip the competition check because it is easier to get a higher ranking with a niche site.)
Google Auto-suggest:
Google Auto suggestion long tail Keywords
This is a tool by Keyword Tool Dominator which actually takes the default feature of Google’s auto-suggestion to the next level.
With this free tool you can easily find all auto-suggested keywords, and it will allow you to download keywords in .csv format.
You can then use any of your favorite keyword research tools to check other important details about the keyword.
If you are using Google search to find new long-tail keywords, I highly recommend that you make a shift to this one.
WordTracker Keyword Tool:
WordTracker is a popular SEO keyword tool. Using WordTracker Keyword Tool you can easily find profitable long-tail keywords along with important details like searches, competition, IAAT (keyword in anchor and text) and KEI (keyword effectiveness index).
With a free confirmed account you will be able to get 100 keyword results. I actually find this tool to be very effective, as you can easily find long-tail topic ideas. Here is a screenshot of this tool in use, to give you a better idea:
Wordtracker Keyword tool
You can also consider taking their 7-day free trial to get advanced features like:
  • The ability to see 2000 search results
  • The option to use the related search tools (this is very handy)
  • Access to search engine data using SEMRUSH
  • The option to save your lists
  • The option to get other details like competition details and KEI
You can create a free account for WordTracker and start using this tool right away, or grab a 7-day free trial of their advanced version as suggested above. Here is the link to sign-up for a free account.
UberSuggest:
Ubersuggest Long Tail Keyword
UberSuggest is a fantastic free long-tail keyword research tool.

Subscribe on Youtube


I have written about UberSuggest before, and Steven has previously explained how he is using this free keyword tool for finding post ideas.
With UberSuggest you will not get important keyword details like keyword competition and search volume.  This tool is best for generating ideas for your long-tail keyword articles.
You can try Ubersuggest here, and read a complete review here.
Long Tail Pro:
LongTail pro is another paid tool, and it offers many features in addition to finding profitable long-tail keywords. They used to be desktop based solution & now everything is on cloud. They are popular among niche marketer & a good tool if you are looking for paid options.
You can grab a complete 10-day free trial from here.

These are some of the best paid and free long-tail keyword tools and software I have tried and can recommend freely.
Once you have compiled a list of keywords, your goal should be to write down high-quality content, targeting those keywords.
Other long tail keyword research tools:
You can check out this guide to understand what you should focus on in order to create high-quality articles.
The key is to write content targeting your users, and then work on optimizing things like heading tags, meta title and description, readability, LSI and keyword density, to make your article search-engine-friendly.
Here are a few more free SEO tools that you should not miss:
If you know of other free tools or software for finding profitable long-tail keywords, do let me know via the comments section below.
Do share this collection with other blogger friends on Facebook and Google Plus!