Showing posts with label WORDPRESS. Show all posts

Monday, 30 October 2017

WordPress Ping List for Faster Indexing Of New Post [Updated]

WordPress ping list are very useful to extend your blog reach to major search engines. We all know that blog has a big advantage over static/dynamic sites in the form of Ping. If you are not aware of pinging feature of WordPress, then here are my 2 cents for you.
When ever you publish, edit or modify a post, WordPress sends ping to all the Ping services which is listed under your ping update service. So this way, ping services get notified about new post and search engine will quickly index them.
WordPress Pinglist

Now by default WordPress notifies all major ping services but we can always extend our limit by pinging more services by adding them manually.
Over the time, I have compiled a list of ping services for WordPress, which will help you to ping more services. Here is list of my working WordPress ping list.

http://rpc.icerocket.com:10080/
http://blogsearch.google.com/ping/RPC2
http://1470.net/api/ping
http://api.feedster.com/ping
http://api.moreover.com/RPC2
http://api.moreover.com/ping
http://api.my.yahoo.com/RPC2
http://api.my.yahoo.com/rss/ping
http://bblog.com/ping.php
http://bitacoras.net/ping
http://blog.goo.ne.jp/XMLRPC
http://blogdb.jp/xmlrpc
http://blogmatcher.com/u.php
http://bulkfeeds.net/rpc
http://coreblog.org/ping/
http://mod-pubsub.org/kn_apps/blogchatt
http://www.lasermemory.com/lsrpc/
http://ping.amagle.com/
http://ping.bitacoras.com
http://ping.blo.gs/
http://ping.bloggers.jp/rpc/
http://ping.cocolog-nifty.com/xmlrpc
http://ping.blogmura.jp/rpc/
http://ping.exblog.jp/xmlrpc
http://ping.feedburner.com
http://ping.myblog.jp
http://ping.rootblog.com/rpc.php
http://ping.syndic8.com/xmlrpc.php
http://ping.weblogalot.com/rpc.php
http://ping.weblogs.se/
http://pingoat.com/goat/RPC2
http://rcs.datashed.net/RPC2/
http://rpc.blogbuzzmachine.com/RPC2
http://rpc.blogrolling.com/pinger/
http://rpc.icerocket.com:10080/
http://rpc.newsgator.com/
http://rpc.pingomatic.com
http://rpc.technorati.com/rpc/ping
http://rpc.weblogs.com/RPC2
http://topicexchange.com/RPC2
http://trackback.bakeinu.jp/bakeping.php
http://www.a2b.cc/setloc/bp.a2b
http://www.bitacoles.net/ping.php
http://www.blogdigger.com/RPC2
http://www.blogoole.com/ping/
http://www.blogoon.net/ping/
http://www.blogpeople.net/servlet/weblogUpdates
http://www.blogroots.com/tb_populi.blog?id=1
http://www.blogshares.com/rpc.php
http://www.blogsnow.com/ping
http://www.blogstreet.com/xrbin/xmlrpc.cgi
http://www.mod-pubsub.org/kn_apps/blogchatter/ping.php
http://www.newsisfree.com/RPCCloud
http://www.newsisfree.com/xmlrpctest.php
http://www.popdex.com/addsite.php
http://www.snipsnap.org/RPC2
http://www.weblogues.com/RPC/
http://xmlrpc.blogg.de
http://xping.pubsub.com/ping/
http://rpc.copygator.com/ping/

How to add or update WordPress ping list:

Login to your WordPress dashboard. Go to Writing under settings tab and scroll down to update services and add all the above ping list. Here is  a screenshot for quick understanding:
wordpress-ping-services
Well, controlling WordPress ping update services is just first step to SEO and there are many things which you need to do to SEO optimization of your blog. You can refer to my WordPress guide for more comprehensive and detailed post on WordPress.

How To Set Up Yoast WordPress SEO Plugin [New]

This is the guide to configuring the SEO By Yoast plugin. In the 3.0 version, some changes have been made to the UI, but the configuration is still the same. I have updated this with editing meta description & titles for single posts, which has changed in version 3.0.
Whenever we talk about the best SEO Plugins for WordPress, SEO by Yoast emerges as a prominent name. Many of you who are using the All In One SEO plugin should know about this much more advanced plugin, which is available in WordPress with the name, “Yoast SEO“.
Setup Yoast WordPress SEO Plugin
This plugin has integrated many known features of other plugins by Joost de Valk (for example, the Meta Robots plugin, the RSS Footer plugin, and many others). Since this plugin offers many features, setting up the Yoast WordPress SEO plugin is not that easy.
For this reason, I am sharing a tutorial which will help you transition from All In One SEO to the Yoast SEO plugin, and help you configure this plugin for optimal SEO performance.

A Guide To Configuring The WordPress Yoast SEO Plugin:

WordPress SEO by Yoast is a powerhouse for WordPress search engine optimization. However, setting up this plugin might be tricky for some, and a new blogger, or anyone without basic SEO skills, might find it difficult.
An incorrect configuration can stop search engine bots from indexing your blog, or you might inadvertently let bots crawl a part that is not important.
Before we go ahead with our setup guide, let’s look into some of the SEO features offered by this plugin:
  • Verify sites in Google, Bing
  • Title meta settings.
  • Hide RSD, WLW, shortlinks from head.
  • Meta-control for taxonomies, author pages, homepage, etc.
  • Supports Facebook Open Graph.
  • Generate sitemap.
  • Advance permalink control.
  • Breadcrumbs support.
  • RSS feed footer plugin settings.
  • Import settings from other SEO plugins.
  • Edit .htaccess files.
  • Hide date from search engine snippets.
  • Add Google authorship for single author.
These are some of the settings offered by this plugin. There are many more.
Now let’s get started with the tutorial, and set up this free SEO plugin.

Complete Setup & Configuration Guide For The Yoast WordPress SEO Plugin:

If you are using any existing SEO plugin like All In One SEO, All In One SEO (Old), Headspace 2, or any other such plugin, or if you are using any plugins by Yoast such as RSS Footer, Robots Meta, or Yoast Breadcrumbs, you should start by importing your settings into this plugin.
Here is a video tutorial to learn how to set up the SEO by Yoast plugin:

Subscribe on Youtube


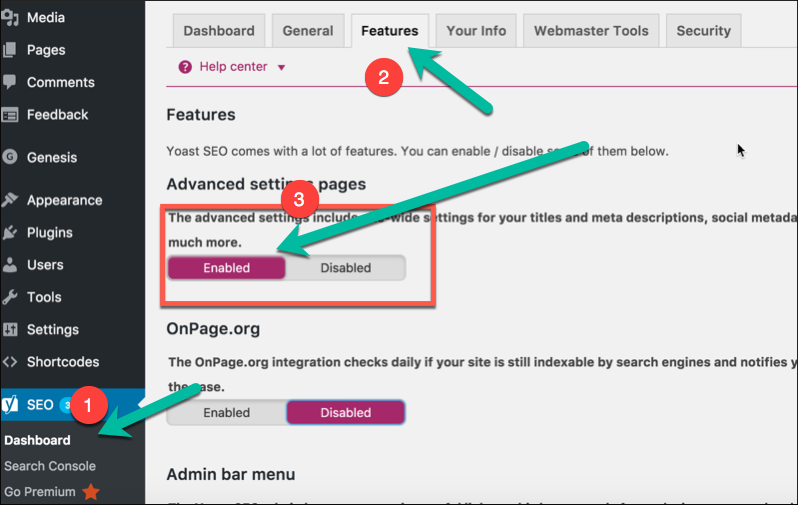
The very first thing you should do after installing Yoast SEO plugin is: Go to Dashboard > Features > Advances setting pages & enable this feature.
setting-yoast-seo-plugin
If you are installing Yoast SEO on a WordPress blog where you were using some other SEO plugin or theme SEO settings, after activating advanced settings you should go to SEO > Tools> Import & Export > Import from other SEO plugins in the left panel. Select the plugin from which you would like to import your settings.
I suggest taking a backup of your database, and then using the option to “Delete the old data after import? (recommended)”.
import-from-other-seo-plugins
WordPress Yoast SEO Dashboard
yoast-seo-webmaster-tools
The first step to getting started with this plugin is to submit your site to Alexa, Google, Bing, and Yandex. After installing the plugin, click on SEO > Dashboard > Webmaster Tools to access this page.
Once you have done this, let’s move to the more advanced parts of this plugin.
Titles & Meta Settings
This is one of the most important parts of this plugin, and I will explain most of it with screenshots and some brief explanations below them.
Once you click on “Titles & Metas”, click on the “General” tab first to see what separator is being used and what that separator does. This will help you to quickly set up the title and metas SEO aspect of the plugin.
Titles & Metas - Yoast SEO
Homepage
Click on the “Homepage” tab of the “Titles & Metas” section and configure the settings for your homepage title and meta description.
Here is a screenshot:
Yoast SEO Homepage Settings
  • Title template: The home title that you want to show in Google search.
  • Meta description template: Your homepage meta description for search engines.
Post Types
This is where you will configure the SEO for all of your post types.
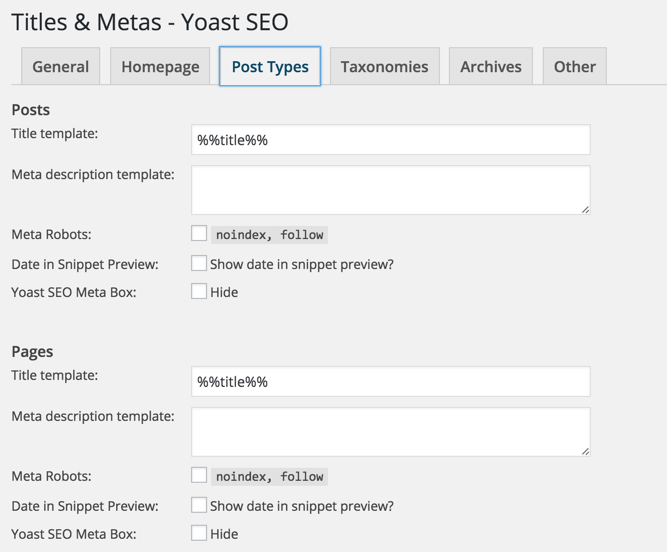
By default, you will have Post, Pages & Media types. If you are using more custom types in WordPress, you will see its section here. Here you can define the SEO for the post, page, and media sections of your WordPress blog.
As I mentioned above, be sure to check out the help section to understand what templates you can use. Also, by default, WordPress SEO by Yoast hides the date from search engine snippets, which is useful for blogs writing evergreen content.
If you are running a news blog and want to show the date for your posts in search engines, you can check the “Date in Snippet Preview” box.
This is how I have configured it for my blog:
Post type SEO settings
Taxonomies and Archives
I prefer keeping tags and categories as noindex and dofollow. However, you should set this up depending upon your own SEO plan.
If you wish to use my settings, simply check the “noindex”, “Follow”, and “Hide” boxes. Once again, you can configure the title template according to your needs. Since we are not indexing tags and categories, you can add more user and brand-centric title templates.
Example: %%term_title%% Archives %%page%% %%sep%% %%sitename%%
WordPress Duplicate content categories
Here you can set indexing for your author and date-based archive. Also, you can disable or enable the date and author archive. I suggest that you check the “noindex” and “follow” boxes, and leave everything else as it is.
Author archive noindex
Other
This is the last one under the “Titles & Metas” settings.
Here is what I’m using which seems to be working well & driving about 1 million page views from search engines every month.
You can ignore “Use meta keywords tag?” Google already made it official that they do not care about keyword meta tags.
YOast SEO Guide
This completes the “Metas & Titles” settings of WordPress SEO by Yoast.
The final options will keep your WordPress blog head section clean by hiding information such as posted short links, WLW manifest links, and others.
Social Settings
In SEO by Yoast 3.0, they have added the Google Knowledge Graph feature. This will show your social media profile in search engines whenever someone searches for your brand name.
The configuration is easy. Simply add all of your social media profiles in the format shown in the image below.
KnowledgeGraph
Here you can configure the Facebook Open Graph meta tags, the default image for Facebook, and the Twitter meta card.
  • You can learn in depth about Facebook Open Graph meta tags here.
I recommend that you add a default image, which will help Facebook show an image when your posts have no image and are liked or shared on Facebook.
XML Sitemaps
Yoast SEO sitemap
Enable the sitemap feature and this plugin will take care of your blog’s sitemap. After creating the sitemap file, submit the sitemap to Google, Bing, & any other search engine that accepts sitemap files.
Permalinks
Note: Don’t confuse this with the WordPress default permalink setting.
In the Yoast SEO plugin, you can configure advanced Permalink settings. I usually use 2-3 settings from here to avoid parameters being indexed in Google searches. With this plugin, in particular, it is easier to get rid of the replytocom parameter, which is quite a headache.
This setting is under Advanced > Permalinks.
Here is a screenshot of my settings:
Advanced Yoast SEO settings
RSS
Yoast RSS feature
This part integrates the feature of the RSS footer plugin. When using it, you can add a link back to the original article in RSS feeds. You can also use it to add advertisements to your RSS feeds.
I simply add the following line after the post content section:
“The post %%POSTLINK%% appeared first on %%BLOGLINK%%.”
Note: This setting is also in the “Advanced” section.
Breadcrumbs (AKA Internal Links)
Breadcrumbs are useful for getting search engines to understand your site structure, and they help users to navigate your site.
However, I have never tried and tested breadcrumbs on any of my sites.
  • You can read the official guide here for a better understanding of breadcrumbs.
Edit Files
Yoast Robots file editor
This is another useful feature of the WordPress SEO by Yoast plugin. You can edit the WordPress .htaccess and robots.txt file from the dashboard.
A word of caution: Whenever you are editing your .htaccess file from your dashboard, always keep FTP access as well, because misconfigured .htaccess files may stop your site from functioning. You can read more about robots.txt and .htaccess below:
I hope this tutorial will help you to set up WordPress SEO by Yoast correctly.
Once you are done making all the changes in your SEO by Yoast plugin, go ahead and use the Google Rich Snippets testing tool to check for authorship, and see how Google will show your blog post in Google Search.
Note: The features below are in the Pro version of SEO By Yoast. These are optional, and you may or may not need them.

Issues with Adding Meta Descriptions & Titles in Latest SEO Yoast Plugin:

Configuring Yoast WordPress plugin
In the latest version of SEO by Yoast, they have made a major design change, which is confusing for old users when it comes to adding meta titles & descriptions.
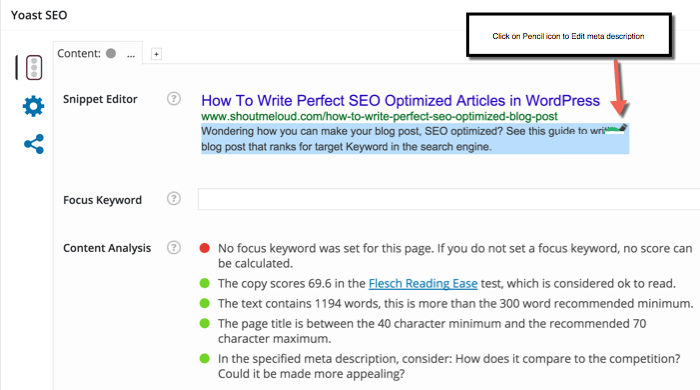
You need to click on “Edit snippet”. Once there you can enter in the “SEO title” (Meta title) and “Meta description”.
Redirects
SEO redirecs plugin
This is another handy feature of this plugin, as it allows you to direct any URL to another URL of your choice.
When you are getting too many 404 errors (you can check that in the Google Webmaster tool), you can simply re-direct them to save your link juice. If you want to learn much more about 404 error pages and SEO, you should read this detailed guide.
Webmaster Tools
Google Crawl isse WordPress dashboard
In my earlier articles, I explain how important it is for you to submit your blog to Google Webmaster tools (aka Search Console), and to monitor all the crawl errors. This way you will know what errors Google is getting while trying to crawl and index your blog. With the SEO by Yoast Webmaster tool, you can see all of the errors inside your WordPress dashboard. You need to add the authentication code (this is a simple step), and after that, you can see all errors from within your dashboard.

How To Write Perfect SEO-Optimized Articles in WordPress

One of the best ways to keep getting traffic for your oldest/earliest posts is to make them search engine friendly.
In the long run, only search engines can help you to get traffic from old posts.

In this article, I will share some tips for writing SEO-optimized articles that will rank better in search engines.
WordPress Seo Article
I run multiple blogs and we have several authors working day and night to keep these sites updated with fresh, quality content.

Sometimes, however, quality can drop (which usually happens due to a lack of knowledge).
Every blog post is like a web page in terms of search engine ranking and you can optimize each post with specific keywords for search engines.
When writing these SEO articles, there are several things that you should keep in mind.
Whenever I hire a new author to work on one of our blogs, I have to give them manual inputs and checklists to help them to write better articles. Apart from selecting topics, there is a complete SEO checklist that must be followed.
(Note: I used to send this information out in an email to all the authors in my blog network. So I thought it would be a good idea to compile all of this information into a post. This way, ShoutMeLoud readers will also benefit from this information and learn how to write SEO articles as well.)
Also note that in this post I will not be covering keyword research as keyword research requires a detailed post of its own.
For more on keyword research, check out:

Writing SEO-Optimized Articles:

1. Post Title and Meta Title
First, you need to understand the difference between post title and meta title.
  • Post title: How your reader sees the title of the post on your website.
  • Post meta title: How search engines show your post in search results.
If you have not specified a meta title in your SEO settings, your post title will be treated as the meta title.
  • It is important to have your keywords in the meta title.
You can read more about this here:
Pro Tip: Keep your post titles less than 66 characters.
2. Post Meta Description
All of the most popular SEO plugins allow you to add meta descriptions to a post. These descriptions play a major role in search engine ranking.
Think of a meta description as a sales copy for your blog post:
  • In 156 characters, you need to add your keywords and create a description that is seductive enough for users to click on it.
If you have not added meta descriptions in the past, you should start doing it immediately.
SEO optimized blog post WordPress
Meta descriptions are very important.
You should go back to any of your previously published posts which do not have a meta description and add one.
By optimizing your post meta descriptions, you are ensuring that every post you writehas the potential to drive a maximum amount of traffic to your site.
Google sees every blog post as a different web page so you can rank every post for certain keywords.
Meta descriptions are great places to put keywords.
3. Image Alt Attribute
Alt Tag Image SEO
Google can’t read images.  
  • Text is how Google recognizes an image.
To ensure that search engines can understand what an image is about, you must be sure to use proper image names.
Many people make the mistake of uploading images with names like image001.jpg.
  • This is a huge mistake!
When naming an image, keep the name relevant to image itself.
For example, if you take a screenshot of an AdSense dashboard, and you name the image “AdSense”, it will not be targeted. Instead, you need to use a name like “AdSense-dashboard”.
Here at ShoutMeLoud, we use an effective plugin called SEO Friendly Image which uses the image name as its “alt (alternate text) attributes”. This way, when people search for an image at Google Image Search, they will land on an image in one of our blog posts.
If you choose to not use such a plugin, you can always manually add alt attributeswhen you upload an image.
I have seen positive results when using keywords in image anchor text (when naming an image), so you should at least use keywords in your image alt text.
4. Interlink and Anchor Text
When writing a new post, it’s always a good idea to link back to old blog posts so that readers will stick around your site for longer and also so that search engines can re-crawl these old posts.
This helps in better navigability of your site which reduces the bounce rate- another important SEO factor.
When you interlink, you should use the anchor text technique.
Simply put, when you link to a blog post, you see an option to add a link and a title.
Make sure to fill out the post title with the main keywords for the post that you are linking to.
Interlinking-in-WordPress
At ShoutMeLoud, we also use a plugin called SEO Smart Links for automatic internal linking.
5. Permalinks: Remove stop words
editing-post-permalink
When we write a post, our post titles usually come with lots of stop words.
(For a comprehensive list of stop words: Go here and here.)
So for example, when we write a post with the title:
  • 3 Ways to Make a Blog Business Plan
Our post permalink, by default, would be:
  • domain.com/3-ways-to-make-a-blog-business-plan.html
“To” and “a“ are stop words in the example above.
You can click on edit permalink and change the permalink to “blog-business-plan”, thus eliminating the stop words.
  • Important Note: Never change your post permalink once the post is published.
6. H1, H2, H3 Headings
post-heading-tags
We use the Thesis post styling feature to create the style of our blog posts.
This is fine, but we must not ignore one of the most important aspects of SEO:
  • Using proper H1, H2, and H3 heading tags.
By default, in any SEO-optimized theme, the post title uses an H1 heading tag. So for the next sub-heading, you can use an H2 heading, and then an H3 heading, and so on.
It is always a good idea to use proper heading tags for effective SEO writing, especially when you are writing a long post.
Please refer to this post and this post for a better understanding of how to use heading tags within blog posts.
According to the SEO community, it’s a good idea to use your keywords in H1, H2, and H3 tags.
Final Checklist:
  • Post title for readers & meta title for search engine (keywords in titles).
  • Post meta description (optimize it for better CTR and use your target keyword once).
  • Image Alt text (use keyword).
  • Interlink within a post using good anchor text.
  • Post permalink (remove stop words from permalink).
  • Use proper heading tags (keywords in H1, H2, H3 tags).
For more SEO article writing tips, check out:
Let us know if you have any questions or if you have any other SEO writing suggestions. Share your thoughts in the comments section!
Do you know someone who can benefit from the information in this post? Share it with them on Twitter, Facebook, or Google Plus!